Sunday, September 30, 2007

2007_09_28 2nd floor ceiling

Below you can see them walking around on top of the tongue and groove ceiling for the upstairs bedrooms, loft, bath, and the great room. I was last there on Friday and they were planning to work some on Saturday so I'm already behind on pictures. I didn't get any pictures this weekend (went to Aunt Violet's funeral on Saturday, watched football on Saturday night, and walked, rested, and just watched more football on Sunday. I plan to go back up on Monday.


This shows them walking around up on top of the ceiling boards. They are almost done with the front part of the house.


This is another picture of the same thing just a little bit over to the left as compared to the picture above.


Below you can see where they have their sawhorses set up to cut the ceiling boards to the length they need. It's in the shade there in the afternoon so it works out well for them!


Thursday, September 27, 2007

2007_09_27 Rafters and roofs now over porches

As you probably recall, our builder had all his tools and trailer stolen over a weeks ago. They still haven't been found. His brother, Steve, who along with his crew is working on our house had to leave our job and take his crew to help Scott finish the other job.

After being off on the other job the guys returned on Wednesday this week to continue with our house. Where was my update yesterday you ask? Well, I forgot my camera yesterday (Wednesday) so today's few pictures show what they've done yesterday and today before it rained hard for about 10 minutes today and flooded everything and they had to go home since there was a fairly nice swimming pool on the first floor of our house.

Oh, yes, I'll tell you at the bottom about some people I've met up there this week, but you'll have to wait for that till you get to the bottom of today's entry. HEY! No peeking! And speaking of "peaking", I noticed today that someone has stolen our street sign - AGAIN! This is the 2nd time our sign (Scenic Peak Rd.) has been stolen. The sign on the road 2 tenths of a mile east of ours on Hwy 24 (Walker Gap Rd.) was stolen a month or so ago too! I called the St. Clair County Transportation and Engineering Department to let them know. They said they'd get it replaced, but they'll have to order one so it'll take a few weeks. They told me that when I called them about the Walker Gap sign too, but it only took a couple of days. I asked her what the heck if going on with the stolen signs and she said that this is the worst year she's known for street signs being stolen! What do people do with them anyway?

Below there is a picture from the front of the house that shows water standing on the sub floor. It's a LOT worse in the corners of the house (laundry room, master bath and closet) where it's about half an inch deep! Steve told me by phone this afternoon that they have holes drilled in the sub floor to let it drain, but they must be stopped up. He'll clean them up tomorrow so it can drain and dry out. You can see some of the water through the front door in the picture below.

Steve changed the 3 windows upstairs to align with 3 of the 4 windows and doors that are downstairs on the front side of the house. We both (Kathy and I) like it much better this way when you look at it from the front. Even if something looks weird from the inside (and we don't believe that it will anyway) we believe this is better.


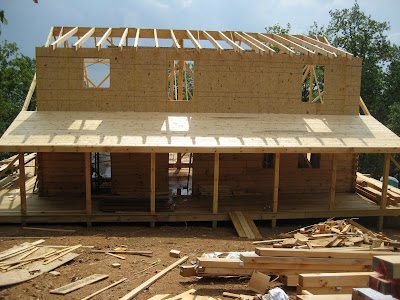
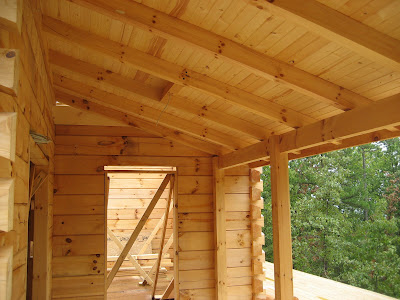
There are more rafters up now and the porches (front, screened, and dining room) all have ceilings on them now. The picture below is of the screened porch outside the master bedroom. You are looking toward the door that is between the great room and the screened room. That's so that you can get onto the screened porch from the great room without having to go through the bedroom. There will be another door on the other end of the screened room to get out onto the deck.

This is the area outside the dining room. It'll have a roof, but not screened in unless we have loads of money left over at the end of this process (about as likely as me being crowned Miss America next year).


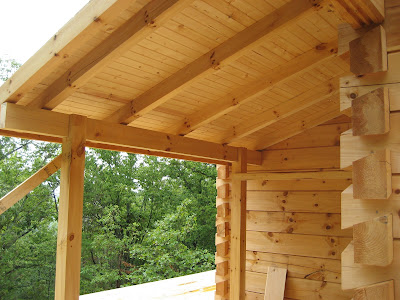
The picture below is of the front porch with the ceiling on it. Right now it stops just short of the bottom. You can't see it here, but if you were to look up at the very edge at the bottom you can see about an eight of an inch or less between the end of the ceiling boards and the beginning of the boards that run along the length of the porch. Steve said that there will eventually be another board along the length of the porch to finish it off and cover up the "gap". Later the gutters will fit up under the edge of the roof. No, I don't "see" it yet in my head very well, but that will be a while yet!


Here's a closer view of the boards on the ceiling of the porch. One day I may put a swing out here on these rafters. We'll see. We might prefer one on the screened porch. Maybe both?


OK, here's the deal with the people I met up there this week already:

First, on Wednesday afternoon a guy named Daryl Wester walked up and asked me if I needed to hire any carpenters. I told him that I was just the guy who was having to pay for this, but I wasn't the guy in charge of hiring for the crew doing the work so he'd have to talk with Steve.

He lives a few miles down the highway next to the cell phone towers. He was working for a contractor, but they finished the job he was working on and so far the contractor doesn't have another project lined up so he's looking for a job since he can't wait forever on the other guy. Steve told him that although he doesn't need him right now he may before long so he took his name and number and told him that he'd let him know. The guy said he's been a carpenter for 18 or so years. Even if he doesn't get work for Steve it'll be handy to know a carpenter nearby should we want one later for something after the house is built. I saved his phone number.

Later on Wednesday afternoon another guy drove up and asked whether he could look at the construction. I went down from the 2nd floor to meet him. He said he loved it so far. His name is Jeff Angel. It turns out that he is a contractor from Birmingham who is doing some work for his best friend, Crawford Logan Taylor III. He goes by "Logan". Logan Taylor is a stock broker for Merrill Lynch in the Birmingham area and apparently his dad practically started the Birmingham office.

The interesting thing is that Jeff says that Logan Taylor owns the house (that we may have told you about) that is known all around this area as the "underground" house. It is a house that is up here on the top of the mountain that is built sort of into the side of the mountain so that one side of the house is underground. The other side faces the valley and has a spectacular view of the valley and the mountains off in the distance. We have been curious to see the "view" side for years, but never went up the drive since we figured that someone lived there and we didn't want to intrude.

It seems that Logan (who still lives in Vestavia in the Birmingham area) has hired his friend, Jeff, to renovate the underground house for him. The house is only about 20 feet from front to back, but it's 80 something feet long. The rooms are all on a line going parallel to the ridge of the mountain so that every room has a view out the windows (or doors) of the valley below. Jeff says that they are basically going to have to gut the house due to termite damage. They're putting in granite counters in the kitchen, etc and fixing everything up so that Logan can use it as a weekend place or as an investment property. Apparently, Logan likes skeet shooting and may use that place for some of that.

Now for the other thing of significance about Logan Taylor. He is the person who owns the lot that is right next to ours at the end of the road down where the gate is! We have wondered who owned that land and now we know. I'm not sure what Jeff told me about Logan's intentions are about the land next to us (I know, that should have been the one thing that I should have remembered!), but I think he may plan to build a home there. I don't know if it's to be a full-time home or if it's just a weekend place for him.

Jeff said that Logan was happy to see us having the road graded and gravel put on it since it was horrible before. He doesn't have to tell me that! Who knows, maybe someday if our money holds out and we want to upgrade the road some more to maybe a blacktop or a tar and gravel surface we could go in with him and share the cost.

Anyway, in one day I met 2 nice guys who are contractors or carpenters and also learned who our next door neighbor may be some day! Jeff says that Logan is a really great guy and we'll like him. Although we still like him, our "investment guy" is still the man we used in Florida. Who knows, maybe he could help us manage our dwindling assets once this house is built and we see what is left to manage! Jeff never told me whether Logan is married, has kids, or anything like that so there's still a lot to learn I guess. Tomorrow's another day!

Tuesday, September 18, 2007

2007_09_18 Porch rafters and 2nd floor framing started

We missed going up there yesterday since we went to see Vicki Brown at Lowe's to see what she had come up with for a kitchen design that would include all the things that Kathy wants in the kitchen and get it in there. Although the rest of the house is large enough, I actually was stingy on the width (in particular) of the kitchen. So, although it appears that we can jam all the things (wall oven with microwave above it, cook top, refrigerator (yep, we will have one of those), and a dishwasher), they are going to be pretty tight!

This was basically because I was trying to cut down on the square footage of the house and I didn't want to skimp on the master bedroom/bath or the great room where we'll spend most of our time. Maybe I should have gone ahead and enlarged it, but it's going to be adequate for the two of us. When the rest of you come to visit we'll just be a little closer together in the kitchen than might be ideal, but we'll live through it!

Let's just get to a few pictures and then I'll describe a couple of problems later below. The picture below is taken from the road in front of the house. You can see the porch rafters and support posts as well as 3 windows upstairs. More on them below the picture.


As you may be able to see, the windows upstairs are close to being directly above three of the doors and windows below, but they are about a foot or so off right now. We had discussed this with Kathy Pearson before the final plans were drawn by the design people at Heritage Log Homes. We all preferred that they be aligned for strictly esthetic purposes. When we got the final drawings they had not made that adjustment. Kathy told us that was not a problem since it could be adjusted onsite by them with no problem. However, the one doing the actual onsite construction didn't get the memo from Kathy so he did what was on the plans. We discussed this today and we all agreed to move the windows upstairs so that they would be directly above three of the doors and windows that are below them on the first floor. Steve said he'd move them when they are back to work on our house again. More on that later!

Below you are looking from the driveway toward the house so that you can see the front porch being formed. It's going to be a nice place to put a swing or something some day.


The screened porch outside the master bedroom is shown below. Steve hasn't started doing the framing for the screen "windows" etc yet, but he did agree to put in a wide board (like the porch at Kathy's sister Rosie's house) at a low "table level" so that we can use it to put plates on should we want to eat out there sometime. After the picture below I'll show you a picture of her screened porch so you can see what I mean.


Below is Rosie's screened porch. You can see the way that her husband, Robert, who was the builder, built this so that it can be used to put things like plates, glasses, etc on if you need a flat surface a little wider than what would normally be there if you were just making a frame for the screen as opposed to making the frame for the screen also serve another purpose. We have always liked that. Steve said that he'd do that for us.


The image below is the roof that will cover the area outside of the dining room. It will be covered, but not (at least unless we find that we want to spend the extra money) screened in like the porch by the bedroom. You can see that the rafters are 4 x 8 inch beams and you can see the bolts that attach them to the support posts.


The view below is taken from the corner of the front porch looking toward the driveway since of the house. I can see a porch swing here someday!


Now, I mentioned a delay coming so here's the reason:

To make a long story short (and I know that all of you are saying that's not possible for me) a theft is going to cost us a delay of a few days! No, nothing was stolen from us or our job site.

We called Scott and Kathy Pearson this afternoon to ask them about moving the windows upstairs and she said she'd needed to talk with us today herself.

Saturday Steve went to the other job that he's doing which was only a few days from being completed to do a few last things. When he pulled up he found that his trailer with all his equipment (saws, nailers, compressors, etc, etc, etc) had been stolen sometime Friday night! He had about $35,000 worth of equipment in it and it was virtually everything he has. Steve even has to borrow some of Scott's tools to do other jobs and may need some of them later for our job.

The really bad news is that Scott said his insurance won't pay for it since it wasn't attached to his truck. He asked whether it would have been covered had he left his truck attached to it and left it there. The answer was no. I may have misunderstood, but I believe he was told that the only way it would have been covered was for him to have been driving with the trailer attached to his truck and then it come off or something like that. Whatever it was, basically his auto insurance wouldn't pay for it, the policy for the house under construction wouldn't pay for it, and he didn't think his own homeowner's policy would either.

So, Scott and Kathy believe that they are going to end up having to replace all the tools from their own pockets! Some of them are rare tools as tools go since they have to have larger tools (like 16 inch skill saws etc) because of the size of the logs and beams that they must cut all the time. So, that makes them more expensive and also harder to find as well.

Since Scott needs to finish the other project as soon as possible (to be able to get his final payment I guess) so he will have money to start paying for the new tools and equipment he needs to pull Steve and his crew off our house to finish the other job. They have agreed to work at the other site the rest of the week including Saturday to try to finish the other job for him. Kathy hated to ask us if that was OK, but we'd not only be cutting off our own nose to spite our face, but we also just be real jerks if we didn't agree since they're in a bind financially right now.

Steve told us by phone later this afternoon that he'd make sure that although he didn't get the windows upstairs moved today they'd do that when they return next week. Hopefully, they'll be back by Monday to our job, but I suppose that could be pushed back a day or so if it takes it to finish the other job.

We'll let you know when they get back to work!

Friday, September 14, 2007

2007_09_13 Beams and rafters

On Thursday 9/13/07 a they had to rent a crane from CraneWorks (where Louie Owens works) to hoist the huge beams way up onto the tops of some supports and hold them till the crew could fasten them into place. Below you can see the crane in the driveway supporting the first of the smaller beams that will run across the house from over the kitchen area toward the master bedroom side.


Below you can see the first beam being carefully lined up with their marks so that everything will fit together accurately. The crane support is kept until it is just right.


While it is in the right position they attach rafters to the beam and attach it to the supports underneath. Here Brandon is using his nail gun to attach a rafter on the other side to the beam. By the way, old fashioned hammers are almost never used these days unless they are pulling a nail out since the nail guns shoot in nails accurately, fast, all the way in all at once and with no sore thumbs.


Once the 2nd beam has been positioned end to end with the 1st one it is screwed into the end of the 1st one with multiple long screws diagonally and also attached to the supports and rafters as the 1st one was. Another tool tip - If you're putting in lots of 10 inch screws, etc it's apparently not a good idea to use what most of us homeowners tend to use (cordless 18 volt battery powered drills). You'll notice that they use corded drills. No battery powered drill would be able to handle much of this heavy duty work!


Below Roberto (I think ... it's hard to see which worker it is) is reaching for the rope on the end of the beam so he can more easily get it to angle the way he needs it to go to sit on its supports.


Now they are working on the 3rd of the shorter beams. When this one is done they will be finished with the beams that run across the house from side to side.


Now that the smaller ones are done they're ready for the big one! It's the ridge beam that will run from just at the edge of the loft to just past the French doors at the far end of the great room. It will be the main support above that area to which everything else will attach. It is heavier than the others since it is longer. This one weighs well over 1,000 pounds.


They got it in position, but when they were checking it out to make sure it was fitting correctly they determined that it was 5 and 1/2 inches too long. So, down it came onto the deck so they could cut some off. Then back up onto the log support post by the stairs between the foyer and the great room and onto the support at the other end to be fastened into position.

The other row of beams is attached to the ridge beam by 3 large half inch diameter screws that (if I remember correctly) are 18 inches long and go through the cross beams and into the end of the longer ridge beam.


Below you can now see the ridge beam resting on the top of the 9 inch diameter log support post and butting up against and perpendicular to the other beams.


Below there is a close-up of the way the two sections are joined together and the way the ridge beam rests on the log support.


Now that the ridge beam is up rafters can be attached. You can see how steep this section of the roof will be. I think that Steve said it will be 56 degrees, but I'm not sure. It might have been 55.


Can you guess what the thing below is and for what it's used? No? OK, then I'll give you a hint so you can have a shot at it. See below the picture.

Can't get it yet? Here's another hint so maybe your aim can improve. Where are the hints? There have been 2 already. You missed them? OK, look at the picture below. This is what it helps to do.


Below are the 2 things together. Did you guess it yet?

OK, the wood above with the red thing around a nail is one of the 2x4s nailed to the concrete basement floor that the stairs are built around. The red strip has .22 caliber blanks that are used in a Hilti brand concrete nail gun to shoot nails through the 2x4s into the concrete to anchor them securely to the floor. Steve says that the gun has quite a recoil to it and it makes a good bit of noise.

The last picture is taken from the road in front. There are lots of boards going all over the place, but most of them are just temporary supports to make sure everything stays in alignment while the beams and rafters are all put into place.


We're expecting rain most of the day on Friday so I don't expect the crew will make the drive up here. It'll probably be Monday before they get further work done, but they put in a good day on Thursday!

2007_09_12 Basement stairs roughed in

They have put in the rough staircase from the basement. They will later install the finished stairs on top of these. The area under the stairs will be walled off and the water heater will go under the stairs.


The door will be at the end of the bottom step so the stairs will be visible from the foyer up above. So, this will be heated/cooled space so we'll want this to have insulation in these walls.


We want the door at the bottom so that we do not have to build a full wall up in the upstairs which would both keep the stairs from being open (as opposed to ones that you could not see through) and would result in a wall that would obscure the view from the foyer toward the windows in the great room.

The last picture is just of the system that is used to keep the settlement of the log walls from harming things that are connected to it (e.g. cabinetry) so that the logs can move downward by allowing the screws to slide in the groove in the boards attached to the logs.


The next blog entry will be of the beams and rafters up in the ceiling. Hopefully more interesting than basement stairs.

Friday, September 07, 2007

2007_09_07 Ceiling almost done, wiring, and hardware etc

They are pretty much finished putting on the ceiling for the first floor rooms that have ceilings other than up at the roof level like over the great room. Here is a picture taken from up on the road (Scenic Peak).


This is a view of the master bedroom looking toward the French doors that will open out onto the screened room. Note the wire (if you can see it) sticking down from the short cross beam toward the other end of the room (not the large beam - past it). That's for the light/ceiling fan. However, it seems to be too far toward the far end of the room from what I saw today. I got there just as they were leaving and didn't have a chance to ask Steve about it.

Can you see the thickness of the ceiling boards above the dining room? I think I said they were 1 x 6s the other day. They are 2 x 6s instead. You can also see the dovetail joints on the walls here also.

The round metal thing is the bottom of the tightening system that is used on all the log walls. This one just happens to be visible since it's at the bottom of a 2-log portion that goes above the French doors in the great room. The long screw (with the spring and nut on top) screws into this thing which is mounted on the bottom of each log.

There won't be another update till the middle of next week since we're going to visit with Kathy's sister, Rosie, on Monday and Tuesday.


2007_09_06 Ceiling started and spider

The ceiling (tongue and groove 2 x 6 pine) is now being put over the rooms of the first floor that have ceilings. Well, they'll all technically have ceilings, but the great room ceiling will be up at the roof level and that isn't there yet of course. The "hole" in the front part of the ceiling is the elevator space.


Below is a spider that now resides in the basement. He's about 2 inches across and has an impressive web although you can't really see it in the picture. The only part of it that you can see is the spiral or spring shaped white part that goes above and below the spider. It's goes about 6 inches above and below him (or her). The spider has yellow markings. If you get too close, the spider begins causing the web (and spider of course) to vibrate rapidly back and forth. I believe it to be a Black and Yellow Argiope (or Argiope Aurantia). The other side had larger portions of yellow on it, but I couldn't get a good picture from that angle. I'll have to get rid of the guys' pet though since she produces 300 to 1400 eggs and they hatch in the fall!

Below is a shot I took from on top of a stack of beams in the front. I like the view from up there. During the winter when the leaves are gone we may have a nice view even without taking out any of the trees below.

Here is a view of the ceiling over the foyer and sort of over the closet in the entry way and the half bath just beyond it. You can see the first of the wires in any of the pictures. There is a wire hanging down (for a light) from the center of one of the beams.


Here you can see the new view into the master bathroom with the ceiling going in. No, there won't be a hole between the wall and ceiling! :-) That gets covered up later. However, you can see that this space is where the tops of the long screws and the springs go.


Looking into the bathroom to the right from just inside so you can see the other end where the toilet will go. My Jeep is out front on Scenic Peak. The timbers you see are what I climbed up on to take the pictures of the house from the front so you could see the ceiling better. Yeah, dumb. When I was up there a couple of the boards started to slide down toward the house an inch or two. I got down carefully! I'll take pictures from the road next time!


Below you can see a close up of the mechanism that goes on top of each of the log support posts. This is for the purpose of allowing adjustments to be made later to keep things level once log settlement takes place.
You can see the large nut that allows you to turn it to lower the support beam above it, if necessary, to adjust it downward whatever distance the log wall may have settled over time. According to Steve, these spaces are covered up by a cylindrical piece that covers up the metal piece.
He said that in a year or so after completion he'll come back and check everything with their laser levels to see what settlement has taken place and make the necessary adjustments. He also said that his experience is that logs such as ours (6 x 12 rectangular logs) don't seem to have as much settlement as round logs. He said he has no idea why that is, but he's convinced of it.

Steve and I discussed several things on 09/06:
Kathy wanted to make sure that he understood that we want lighting underneath the cabinets in the kitchen. He said that was no problem and can be provided for later. In the kitchen they will put up another "wall" behind the cabinets, etc to allow the cabinets to be attached to it and
the wiring can be in between the two walls. I guess that the second wall is attached to the logs with screws that are allowed to "float" in vertical grooves in the second wall so that as the logs shrink a little the screws in them just slide down through the grooves in the wall material as opposed to actually trying to push down on the wall itself causing it to bow or tear up, etc. That's basically how everything is attached to the log walls since they WILL move over time.
Steve also said that after they apply the wood preservative to the outside of the logs they will go back and caulk any of the cracks in the logs that are large or that slant downward toward the inside so that any rain water will not tend to run down toward the inside of the logs which would eventually cause damage. He said that small cracks that would only allow water to enter if it were to go UP may be left as they are. I'll be more inclined to caulk whenever possible.
Steve did (before I got there) recognize that they had inadvertently not provided for a door at all in the storage area in the laundry room (or pantry if you prefer) and they had removed the studs that were inappropriate.
We discussed whether we might want to switch some of the French doors (dining room and master bedroom) so that the primary door would open whichever way (right hand or left hand) is best for us. He said that's no problem, but we haven't determined yet which way is going to be best based on what furniture goes where.
We also talked about lighting outside. We want to have flood lights outside (both up on the deck and down at ground level and we want to be able to turn them on all at once if desired or at least all in front or all in back. Steve suggests that we also allow for them to be motion activated. That sounds good to us.
I asked him how the gutters would be routed from the roof to the ground. I didn't know at what points he expects that the downspouts would make their way down through the deck to the ground below. He thinks that there will probably be a couple of them that will come down from the front of the front porch roof to the ground in front of the house and there will be at least one on the back side that might go down the corner of the screened room, through the deck, down to the ground at the back of the house and then out and down the hill away from the house. I hope that the ones in the front of the house can be routed toward the outside edges of the house and away from it so that the water coming off the front will not just be left to drain down to the front of the basement wall. I'm sure it will be.

I asked Steve if they could please be sure to save the left over round logs for us. He said that they could. He asked what we had planned. I told him that we weren't sure, but if nothing else comes to mind, Kathy said they could be used as seats out in the yard for grandchildren, etc. Steve said that if we want him to he could use them as supports for a mantel above the fireplace (or fireplaces since we also will have one in the master bedroom). I actually like that idea. I asked whether mounting them on the wall (sticking our lengthwise from the wall) would be a problem and he said not.
I asked Steve if he had an idea how much longer his part might take. He said that he hopes to be finished with the dry-in (with the felt on the roof) in possibly as soon as 3 weeks! That isn't with the metal roof on (which someone else must do), but at least the inside will then be protected from the weather.

Wednesday, September 05, 2007

2007_09_04 Studs for interior walls going up

It's been almost a week since I updated things here. Not long enough you say? We've been busy with other stuff and I haven't been up there since last Wednesday (8/29/07).

They have begun to put up the studs for walls for the rooms on the first floor. The interior walls will eventually have log siding on them.

Below you can see into the house from the front door toward the staircase and past that the French doors in the great room.


The view below is from in the foyer looking to the left toward the kitchen window. You can see the support posts that are the 9 inch diameter logs. Note the metal things on top of them. They allow for about 4 inches or so of settling. The larger beam you see is sort of between the kitchen and the dining room. The other beams are also going to be exposed as well.

Another view of the round log supports and the beams going the length of the dining room.


Below is a close up of the beams. This is looking up from the kitchen area.


The picture below is of the dovetail corners in the great room that are next to the master bedroom. The drawings from Heritage originally showed the wall between the great room and the bedroom to butt up against the end of the dovetails that are the ones on the right side in this picture. It would have made the left and right side of the great room look different since the ones on the left side (between the dining room and the great room) would have been both visible whereas the one on the right would have shown the dovetails on the left and the one on the right would have been "part of the wall". We didn't want that so Scott and Steve said they'd move the wall back 6 inches toward the bedroom to allow both ends of the dovetails to be visible. It means having 6 inches less in the bedroom, but 6 inches more in the great room.


Great room French doors. Note the 4 inches above the doors to allow for settlement and also the springs on the top of the log walls.


There is still one (and I think it is the only one although I didn't walk all the way around the house to see) of the nuts that has not been screwed down onto the bolt to compress the spring to tighten the logs together. Maybe there's a reason to leave this one (or maybe others) till later. I didn't see it until after Steve and his crew had gone home today.
He said they won't be on the job tomorrow since he has to go to the hospital with his wife to see the sonograms of their baby. One of the crew members (Brandon) is about 21 and he's Steve's stepson, but he and Brandon's mother have not had other children until now. So there's going to be about a 21 year or so gap between his stepson and the new baby.


Below is a shot from the kitchen looking toward the master bedroom window. The stairs up to the 2nd floor will start just past the 9 inch log support posts. The fireplace in the great room will be on the wall past the logs.


I stayed up there today for over 4 hours taking measurements of rooms even though the inside dimensions will be slightly different once the log siding walls are put on. However, I wanted to get the approximate measurements to make sure that we can plan better what furniture will fit where.
I didn't spend that long just taking measurements though. I also spent that time picking up trash all over the site and bagging it. There are always tons of plastic bottles, stuff from them eating lunches, etc. I picked up 4 and a half large contractor size bags of stuff from inside the house, the driveway, the woods around the house, etc. Thank goodness it was only in the 90s today instead of the 100+ from the last few weeks.
We go to the local Lowes tomorrow to talk with one of their kitchen design experts to see what suggestions she may have. We have a few possible designs, but would like to see what advice they can give. We may choose to "extend" the kitchen a little bit slightly into the area previously designated as the dining room. It really doesn't matter as long as we still have enough room for the table and china cabinet in the dining room since the kitchen and dining room are basically one long area.
I'll probably go back up there on Friday since they won't do any work on Thursday.