Friday, August 29, 2008

2008_07_25 Outside view after front gravel drive put in

Below you see the barren front between the front porch and Scenic Peak Rd.

They cut in the front driveway and put crush run (or crusher run) rock on it. Beyond that is nothing but hard packed dirt devoid of all vegetation until you get to the little fringe of weeks just this side of the road. I have no plan to get rid of the weeds just yet since they are the only thing holding the dirt up there!


This picture shows the way the driveway in front angles toward the house from Scenic Peak. The driveway down into the garage turns off just to the right of this one so the two drives and Scenic Peak all converge behind and to the left of where I was standing to take the picture.


Below is a corner view of the house. You can barely see the garage below.


We have major work (and that means money) to be done outside. There are the driveways and then there's the landscaping to prevent the erosion. Anyone want to rent an upstairs room with a great view?

Thursday, August 21, 2008

2008_07_16 Elevator shaft and bad elevator wall panel

The first picture is the elevator shaft. The guys working there have been here now for probably 5 or 6 days at least working on putting in the elevator and they have at least one more return trip for fine tuning and putting in some trim that had to be re-ordered. I think they originally planned on 2 or 3. Not my problem.


The picture at the bottom of this lengthy discussion is of one of the oak panels that form the walls of the elevator. I almost missed getting what I intended to capture. However, at the very left side of the picture you can see a dark stain on the oak.

When I saw it and took this photo I mentioned to the installers that there was a large stain on that panel. They said that they would get it off before installing it. I didn't see the other panels since they were behind that one.

The day that they were installing them Scott and Kathy were here and we were having a very serious discussion about money. They informed us that although their plan had been to pay us back a little over $20,000 that we had put on a Lowe's card (in order to get kitchen and bathroom cabinets ordered in time so they would be ready when the builder was) as soon as the next bank draw came in they had made a horrible mistake and would not be able to do so! Apparently they had thought that the elevator company had already charged their construction debit card for the elevator (over $20,000 also), but they had not so the money wasn't going to be there to pay us back!

Now, we've just been made aware that we're stuck with a $20,000 credit card bill that we have to decide how to pay. So, you can imagine that we were preoccupied so I didn't watch the elevator guys at all as they were installing the panels. It was about 8:00 at night and the elevator guys came into the room where we all were and said that they were done.

I went to look at the elevator and was appalled to see that the stain in the picture below was still there as obvious as it was before and also that 2 other panels had similar stains! I told them that they were not going to be acceptable and they'd have to replace them. You should know that they had spent all day installing them. Things are a very tight fit and there was much hammering to get them fitted in where they have to go so I know they didn't want to hear that.

They had tried to sand the stains out, but if you know anything about working with oak you know that once any stains get down in the pores of the wood it almost impossible to sand out unless you really take a lot of wood out. I could tell that they did try to sand it out, but it just made the surface there smoother than the surrounding areas, but did not resolve the problem.

One of the guys told me that he realized that the panels were not acceptable. I asked him why they had proceeded to go ahead and put them in since he already knew they were not going to satisfy me. He said that he just does that the bosses tell him to do and he said that they knew they had been stained when they were delivered to the elevator company by Fed-Ex and they were unloaded during a big rain storm.

Then after they got water on them he said that someone stored them against something metal. Well, that was the worst thing they could have done because the result was that dark stain down into the oak. When I was told that their boss had told them to go ahead and install them I couldn't believe it and that made me mad so I don't care if they make 20 trips up here from the Montgomery area to get this resolved.

I told Scott and Kathy that I expected them to call the owner of the company the next morning and make sure that he understood that we would not accept it as it was and they would have to resolve it whatever it took. They agreed. The next day Scott and Kathy called us to tell us that the owner wanted to send someone to look at them and if they were as bad as we said they were they would take care of it. So, they have been coming up and checking, measuring, re-ordering, re-delivering, and re-installing and they probably have just one more day before getting it done.

The State of Alabama elevator inspector came up this week and inspected all the hydraulics, motors, cables, etc and it passed the inspection. It works now, but they need to finish some more trim, etc and Scott then has to put in the Bolivian Rosewood flooring down in there so it will match the other floors and it'll be good to go.

Now that I've complained about this for what must seem to be the length of a novel I'll show you the picture!


2008_07_15 Front drive work and deck rails progressing

The builder, Scott, started trying to get the front driveway cut in so that it curves from the main driveway, in front of the house, and then back up to Scenic Peak Rd where you see the gravel pile.

The area where Scott is in this picture is actually a very sharp incline. I know it doesn't look like it here, but when you go up it you can't see the road in front at all once you get to about where he is. Going down it makes you afraid that if the gravel lets you start sliding you might just end up on the deck of the house!


Here you can see the progress on the deck rails.


2008_07_14 Deck rail construction and fireplace logs

The deck rails are now finally going up. First come the posts and then the rails. The posts are quite substantial and, as you'll see later, are securely bolted to the deck.

Below is the view looking toward the south on the east side of the house. You can see the rails leaning up against the house on the right. (The things at the far end are not rails. Those are the temporary stairs that were taken down from inside when the others were put in.)


This shot was taken leaning over the edge of the deck looking down. You can see the two large lag bolts that are used to attach the posts to the deck. On the left side you can see the shadow of the deck on the dirt below.


Here is a view from the side.


Scott opened up the gas log sets and put them in each fireplace. They're going to look fairly nice once we ever get the gas line installed and can see them "in action" we think. We're not sure now when the gas lines are going in though since the gas company wants to do that after the driveway is done and we're trying to figure out the money part of that. We're getting estimates. :-)

2008_07_12 Clay's visit and stair rails up now

The first weekend after we had all been in Navarre Beach, FL staying with Kathy's family Clay drove over to help me move things around, put up some peg board in the workshop, and in general help us get the house to be more livable.

Clay is a big breakfast cooker so before we started doing any work he fixed some microwave bacon and scrambled eggs with cheese! Clay's welcome any time!


The rails have now been installed around the loft and hand rails for the stairs. They needed more sanding since they were pretty rough. I knew that the builder would never sand them so after Clay left to go back home I sanded the parts that your hand normally would feel as you went up or down the stairs. I actually spent about 6 hours or so sanding and could have spent another 6, but after working all day with Clay and sanding till nearly 11:00 that night I was pretty much done for so I finally said enough was enough.

The rails have not been polyurethaned yet. The painters are supposed to do that soon. Unfortunately, that process will roughen them up again, but at least I'll know that underneath they were once smooth. I guess that some day I could re-sand them lightly with 400 grit sandpaper to get the smoothness back, but I'm going to leave that for a while I think since there are more pressing things to do.


2008_07_10 Stair rails have arrived

The rails that go inside around the stairs and around the deck outside arrived at long last. They started putting the inside ones around the stairs first since they were trying to finish the work inside as soon as they could.

Below the post at the top of the stairs is being put into the loft floor. The post has a threaded bolt in the center of it and it will be screwed down into that hole that is being drilled.


The picture below shows them checking to make sure that the railing at the edge of the loft is plumb before attaching it to the log support post.


Tuesday, August 19, 2008

2008_06_27 Still moving the next day while work continues

We're "moved in" now, but the work continues around us as we try to figure out what to do with stuff.

Omar is putting in the last of the rock at the top of the fireplace. I doubt that you can see it in this shot, but the rock actually goes up into a wood box that allows the rock to appear as if it goes all the way up to the roof itself. However, since logs may settle and rocks don't, you couldn't put the rock up against the ceiling or it would get smushed if the wall settled. So, the rock goes up into a pocket that allows it to have about 4 or 5 inches of free space above it, but at the same time it looks like it's all the way up to the wood.


The DirecTV guy came to hook up the TV and make sure that the satellite dish was mounted properly. Steve did most of the work putting it up there after they had come out previously and told us where they wanted it. Originally they were going to put it on the metal roof of the balcony, but later they said that it had to be mounted to the side of the house. There must be 12 or 15 bolts holding it up there. Let's just say that it isn't going anywhere anytime soon.


Here is the loft. The computer desk is there on the left. All the stuff in those boxes is supposed to go in it? Do you see the problem here?


Here is the small bedroom that has the bathroom attached to it.


Here you can see the TV wall mount with it pulled out away from the wall about 3/4 of the way. You can see the electrical outlet and the HDMI cable to the right of it.


Brandon and Steve are adjusting the position of the TV.


Below you can finally see the finished product with the TV in place and where it should be.


This is the END of today's pictures. This is Charlsie being compelled (by herself) to vacuum up any of the sand that might be loose in the mortar that the used between the rocks. It's not even dry yet. Later when it dried it was basically the color of the rocks.


2008_06_26 Moving day pictures of Rose, Merrill, and Charlsie

Moving day! From the pictures you've seen recently you should know by now that the house is in no condition to be lived in. Heck, we don't have air conditioning (and that's a requirement in Alabama in June), faucets, or even toilets.

It's going to be like camping if we stay there. Our plan, however, is to spend the next night back in the empty apartment (where there's AC, water, and toilets), the next night with Kathy's sister, Rosie, and then we have a week planned on the beach in Navarre Beach, FL with Kathy's family. So, really they have about 9 days to get those things done before we get back and will expect some more amenities.

This photo is Charlsie and Merrill looking to me for help while Sergeant Rose is momentarily distracted. They were all very helpful in getting things put up as best they could while workers were working around them and movers coming in our out with stuff.


Here you can see that there are scaffolds still set up as they work on the fireplace rock.


I only took 3 pictures total that day. I had intended to properly document the day from beginning to end to remind myself never to do this again, but it seemed that every second I was needing to tell some mover what room to put things in, etc and the camera just never seemed to be on my mind. Oh, well ... next time.

2008_06_24 Kitchen appliances, shower, intercom system, fireplaces, bridge

These pictures were taken 2 days before we were to move the furniture into the house. You heard that right - two days! So, as you view what was going on imagine how stressed out we were at this point. It was too late to postpone it any longer. We had movers committed to us for 6/26/08 and we were not going to try to extend the apartment stay into July anyway.

Oh, yeah, we had to leave on Saturday 6/28 (2 days after the furniture move) to go to Navarre Beach, FL for the week with Kathy's family that we always try to attend.

Below you can see the wall oven and the microwave with the plastic stuff on them still. In case you wonder about such things they are GE Profile brand as will be the cook top and cook top downdraft vent that you saw in an earlier posting. The refrigerator is different (LG) and the dishwasher will be a Bosch.


Here is the refrigerator. It has ice (cubes in 3 sizes and crushed ice) and water in the door.


Below you can see Roberto's sense of humor in the base for the rock that is to go on the fireplace in the great room. If you were to have a very good picture of this you could also see the sort of honeycomb shaped wire that was stapled (with probably a thousand staples) to the fireplace wall and that the mud type of base was put on and allowed to harden before the rocks were then put on it.

The mantel is sitting on the floor. It is 4 inches by 16 inches and about 6 and a half feet long.

Kedrick Hammond is the guy who put in the security system and also the intercom system. He is getting ready to put in the main intercom panel.


Roberto is putting rock on the fireplace in the bedroom.


The shower tile is now getting close to being finished. That's still just a work light in there and you can see the cord hanging down.


Here's a closer look at the shower. The floor and the strip around the wall are real rocks. The blue drain cover is blue because it still has the protective plastic cover on it.

Below is a view of one of the intercom speakers. There are speakers in every bedroom, the great room, the screened porch, the workshop, and the front porch. You can play radio or CDs through them. Each room has individual volume control and you can select the privacy button if you don't want anyone else to be able to listen to what's going on where you are. I guess I should say that you can "call" someone from any of them and then if you want to be able to listen to their response without them having to get up and go to their speaker to respond you can press both buttons at once (I think that's right) and you can listen to someone from wherever they are in their room.

This feature is also used to be able to listen to see who is at the front door.


This is just a view of the great room fireplace from about halfway up the stairs.


Scott is helping put together the front porch "bridge" to the driveway out front. The notch at the bottom of the boards will be filled with a 2 x 2 to give added support to the floor. There's also the same notch at the end that meets the porch.


Here's the other end.

Now the flooring is on it. The hand rails will come later.

Monday, August 18, 2008

2008_06_23 Fireplace construction, AC units upstairs, dormer storage

The fireplace still looks sort of naked without any rock on it. The wooden square is where the TV wall mount will be mounted. This thing is bolted to a couple of 2 x 10s that are bolted in between the studs in this interior wall.

The small rectangle is the electrical outlet into which the TV will be plugged. The HDMI cable goes through a hole that is beside the outlet.


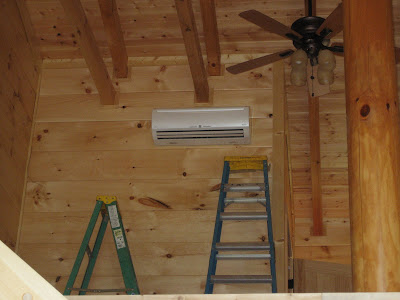
The air conditioning units are the type that don't have ducts that the cooled or heated air goes through since there is no way to get ducts from one side of the house to the other. First, there are no attics to run the ducts through since the ceilings go all the way to the roof. Second, even if we were to build wooden boxes to hide them the only place that would reasonably be acceptable would be against the ceiling near the front of the house, but the area near the ceiling there is taken up by the elevator and there would be no room for ducts hidden or otherwise.

So, instead of cooling or heating the air from the AC unit and moving it upstairs they have routed the coolant through pipes through the interior walls and these units then cool or heat the air "on site" at the units themselves. Each unit has its own remote control that can be mounted on the wall or placed anywhere in the room.


The bedrooms upstairs each have 2 dormers on the south side of the house. Each of them has an area where the roof line goes down too low for use except for storage area. The builder has built doors for them out of the log siding that is used for the upstairs walls so that they blend pretty well with the walls. Ah, you noticed that the door isn't on yet! Yeah, you're right. Also the knob isn't there yet either.

2008_06_19 Granite counter top in kitchen and upstairs bath vanity making progress

The kitchen cabinet disaster having been resolved, the people from the granite place were finally able to create a template for the counters.

We went down to their place and picked out a piece of a type of granite called Verde Butterfly. It comes from Brazil. It looks almost black, but it's really a dark green with little areas of silver, small areas of blue, and gold. However, from a distance it looks almost black.

Below is the left side of the kitchen. The refrigerator will go there where you see the end of the cabinet. We actually have a small area of counter space that is really conducive to doing much work like making biscuits, etc, but we've got what we've got.


You can see the sinks below and where the wall over and microwave oven will go.


Here is the area where the cook top is. This angle shows more of the granite so that it doesn't just look like solid black. You can see why the depth of the cabinet was an issue. The cabinet originally was about 3 inches more shallow and the corners of the cook top were actually out in mid-air.

There is a downdraft vent that pops up when you need to use it. It is about 2 inches deep and 30 inches wide. When you need it you just press a button on the top of it and it pops up. When you're done you press the button and it goes down into the cabinet. There is a motor under the cabinet that makes it pop up and a fan that creates the suction.

The cook top is cool! Well, not temperature wise, but neat. In the bottom right corner of the cook top there is a pressure sensitive area that you just put your finger on (you don't have to press it at all) and hold it for 3 seconds and it locks the cook top so that it can't be turned on accidentally.

When it isn't locked all you do to turn on an eye is to put your finger on the area that designates that eye on the surface (all the controls for all eyes are on the right edge of the cook top) and hold it to turn it on or to set the temperature on it. When you turn it on it gets hot pretty dog gone quickly.

The picture below is of the upstairs bathroom vanity. The medicine cabinet and mirror are just sitting on the vanity top. The lights needed to be flipped up instead of down to make enough room from the top of the medicine cabinet to the bottom of the lights.


Sunday, August 17, 2008

2008_06_17 Shower, Medeco locks, digging trench for utilities, and starting the front pull through driveway

The picture below is the master shower before it was grouted. You can see the spacers still in between the tiles on the wall. There is rock around the wall and it matches the rock that will make up all of the floor of the shower.


The guys below are from Alabama Lock & Key in Birmingham (Brandon with his head up) and they are installing the Medeco brand locks. They are high security locks that are drill proof, bump proof, and just overall very, very good locks that are used in places requiring the best security. They're also pretty nice looking too we think.

They spent 2 days putting them on the exterior doors. Since they cost as much as a small car we didn't even consider putting any of these on any interior doors, but we found Schlage door hardware that is a pretty good match for the color and style so we got those for interior doors.

Here is the finished product on the inside of one of the French doors in the great room.


Scott is operating the backhoe and is digging the trench for the underground phone, power, and Internet cable. It has to come from the back of the house around the corner, up the hill, and to the telephone power pole up on the road. They have to be more than 2 feet deep and buried inside 4 inch conduit.


Here you can see the trench being dug. It goes from the back of the house around the corner and to the telephone pole that's up on the hill where the white van is parked in this picture.


Joe's still working on the tile! He was a hard worker and didn't even want to stop long enough for any chit chat.


Below Scott is trying to get the curved conduit positioned correctly to go from the box on the wall to meet the conduit that is going to be underground. The bend can have no smaller than a 4 foot radius because they don't want any sharp bends in any of the cables.


You can see below that the conduit with the utilities in it actually goes underneath the sewer pipe at the back of the house. Getting the trench dug with the backhoe was a little bit scary since they wanted to use it to dig as much as possible, but didn't want to accidentally hit the sewer pipe either. Scott dug it close with the machinery (probably within 8 or 10 inches on either side) and then they finished the process with shovels.


Right here they are using a shop vacuum set to blow in order to blow some string through the pipe that will run in it from here all the way to the telephone pole about 120 feet or more away. Then once the conduit is buried with the string in it and the power company comes to put in everything they will use the string to tie it to the cables and pull them through the conduit.


Scott is now working on the driveway in front. He's trying to make it split off from the main driveway (which goes down to the garage) and curve from there in front of the house up to the telephone pole is.

Here are some lighting fixtures in the kitchen.


The doors are NOT blue. I don't know what causes this, but almost every time I try to take a picture of the doors outside on the south side of the house the light makes them look blue. They are what you would consider forest green. Also, there is sawdust on the doors from some other work being done out there, but the Medeco locks are what I was shooting for here.


This shows the first piece of conduit (on the right) that has been attached to the house and it has the string through it. Scott is getting ready to put the string through the next piece of conduit and then they will glue the two pieces together. After gluing them they will then bend them around that corner to get ready to start going up the hill.

I was afraid that the conduit would break trying to make the turn, but it made it with no problem.


See? I told you.

Below you can see the progress and where they need to go.