Wednesday, August 29, 2007

2007_08_29 Support posts in basement and beams in kitchen

Well, it's been a week since I updated you with the progress on the house. We have been in Georgia for the birth of our 3rd grandchild. He's doing fine, but a better question might be how his mother is since he was 9 lbs and 12 oz!! Both mother and baby are fine and so are dad and big sis!

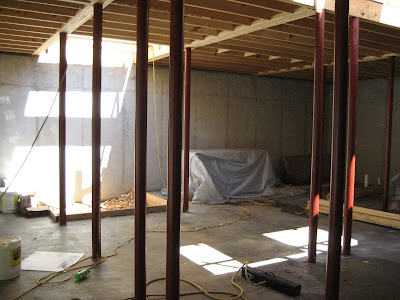
The picture below shows some of the 16 metal support posts that have now been put in the basement in place of the temporary ones you've seen before.


Below you can see the dovetail joint corners, the deck, the retaining wall, the basement, and (at the top of the log walls) you can see the top part of the system that holds the logs tight together as they settle. There are very long bolts that go down through the log walls and screw into a piece mounted on the bottom of the bottom logs. They have a very strong spring put on the top of the bolt above the top log and it is used (with a 2x4 top piece, some washers and a nut that is tightened to press the spring and the logs downward) to keep pressure on the logs so that they stay tight as settling takes place over the years.


Below you can see the wires, tools, etc on the inside.

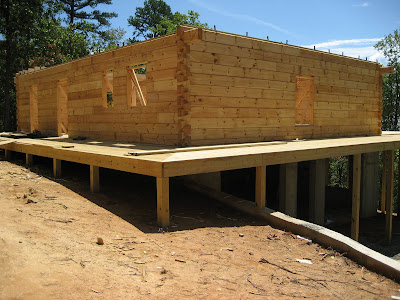
The wood beams going across the top in this picture are the ones that will be the exposed beams in the kitchen as well as the support posts holding them up. The window is the kitchen window above the sink. The window isn't that low. It's kitchen sink high. I just aimed high and it left out the lowest few logs.
I should have taken pictures of the round log support posts that are just out of view here, but I forgot. Kathy was back in the car waiting on me at this point and I was in a hurry.


You can see the beams toward the left of the picture below. Then you can also see (maybe if your eyes are good) the tops of the bolts and springs along the top of the walls.


When we stopped by the house on Tuesday afternoon on our way back from Georgia Steve mentioned something about the new plans for the bathroom. Since I had no idea what he was talking about he showed me. The bathroom was pretty much totally different from the plans we had.
As it turns out, they were revisions that Kathy Pearson had done in an effort to try to maximize the room in the bathroom. She had mentioned something a couple of months ago about having some ideas about how to do that, but since we'd not heard anything further about it we thought that idea had been discarded.
Actually, the new ideas would have added close to 40 sq. ft. to the bathroom by moving the closet for the master bedroom over "into" the foyer area, but the downside of that was that it would also reduce the foyer area by that same amount. The shower was moved from one corner location to another place alongside the left wall, the garden tub moved to a different place, the sink/counter area moved to where the closet had been previously, and the toilet moved from the far right to the corner to the left. Basically everything was completely different.
We might have gone with that if it hadn't been for the fact that the shower was only about 4 feet by 3 feet instead of the 5 x 6 or so we'd wanted originally. The size was important to us because of the possibility that Kathy might eventually need to be able to get into the shower in a wheelchair. Clearly, the 4 x 3 would not allow for that so we had to figure out what to do.
As it turns out in order to get what we want (i.e. a large shower that will allow for future wheelchair access as well as shower seats which she needs now) and still have adequate room for everything we made a hard choice. We decided to remove the garden tub from the master bath and just go with the large shower that is going to be 4 1/2 feet by about 5 feet or so, and still keep the closet where it was originally rather than intrude into the foyer area.
For any of you who will come to visit us some day, you'll now get the benefit of the garden tub in the upstairs bathroom. No, you won't have to take a bath up there. There will also be a small shower up there in addition to the garden tub so you shower lovers can still take a shower!
So, everything is sort of back like it was except that the tub is gone, but we believe that there is going to be adequate room for wheelchair access and get the most important thing that we wanted which is an adequately sized shower.
Clay will be happy that we decided to move the master bedroom wall between the bedroom and the great room about 6 inches in toward the bedroom so that the wall would not obscure half of the nice dovetail joints at the corner of the bedroom where it meets the great room in the corner where the door to the screened room is. The wall had been butted up against one end of the dovetails by the draftsman at Heritage Log Homes. It gave us 6 more inches of bedroom room, but the esthetics was all wrong. Moving the wall will keep both dovetail ends visible.
We're going to move the washer and dryer from the outside wall to the wall facing the kitchen and put the dryer on the right side of the washer. Then we will put the upright freezer that we have against the wall in the corner of the house.
Also in the laundry room we decided to remove the door completely that covered up the shelves in the little storage area there and make the "door" opening wider so that it will be easier to get access to the shelf area to the back and in the corners. We plan to use it as a pantry type area where we can put canned goods, etc and with a small door that would leave a long reach to get to the corners. Scott just suggested that we leave the door off and cut the wall back on both sides and we liked the idea.
We have to decide where we want the chandelier in the dining room so the electrical can be done for it soon. We have to decide whether we want it to be centered in the room or centered over where the center of the dininr room table is likely to be. The two things are probably going to be different due to the fact that we need to put a china cabinet (that takes up a full 20 inches in depth away from the wall even if completely up against the outside wall) and, if we leave some room between it and the chairs so that Kathy can get to the drawers and door in the bottom of the cabinet, that will push the center of the table out further than the center of the room. We haven't decided that one yet. The table is 42 inches wide and 4 1/2 feet long even with only 1 leaf in it. It has 2 more leaves, but it's not the length that is at issue here, it's the width. We need to decide where we want the light to be in the next day or two.
We also asked Scott about the fireplace in the master bedroom since the drawings don't make it clear whether it's shown or not. It is clear that the fireplace in the great room is shown. The drawing, however, seems to show a see-through type of fireplace from the great room to the bedroom, but that is not what we had discussed with them before. Scott said that is apparently just an error since a separate fireplace is planned in the bedroom. They are both going to be gas fireplaces rather than wood.
The short dimension of the master bedroom is 14 feet, but that's from the center of the wall to center of the opposite wall and the walls are 6 in. thick so you'd have to subtract 6 inches (3 inches on both sides) to get the inside dimension so now we're down to 13' 6", but that was before we decided to move the wall over 6" to show the dovetail joints so now we're down to 13' even.
Scott was saying that the fireplace normally sticks out 24 inches (I think) and the hearth would be an additional 16 inches so that's a total of 40 inches away from the wall toward the end of our bed. If we have a king size bed that sticks out 7 feet from the opposite wall then it would leave only approx. 2 feet 8 inches (total of 32 in.) between the end of the bed and the hearth.
That's enough to get her power chair through since it's 28 in. wide, but it's not an abundance of clearance since it's just 2 inches on each side. However, the widest part of the chair is the armrests with the cup holder installed. There would actually be enough clearance since one of the arms would be "out in the open" (out in space above the hearth) and not close to anything.
That would allow the chair to get the wheel on that side closer to the hearth and, therefore, the armrest on the side next to the bed further away from the actual bed. So, it's doable - just not an abundance of room to spare. We need to measure some King sized beds more closely than I did before!

We are going to talk with someone at Lowe's to see if they can design us a kitchen since the stuff on the drawings is not really what we want. Things were just put in there to fill it in with something, but not necessarily in a functional arrangement, etc. We may try to start that process tomorrow. I don't know how long it might take for them to do that, but we'll probably have to make an appointment to do it I'd guess.
You know what? I'm tired of thinking about this stuff for tonight so I'll leave you to worry about this for me for a while, OK?


Wednesday, August 22, 2007

2007_08_22 First floor of logs just about up

Well, I went up to the job site to take a check to Scott and took a couple of pictures. Yeah, that's right; a couple of pictures. That's 2 pictures. I had dropped Kathy off in Springville to get her hair cut and then went to the property. I had to pick her up again so I didn't stay long, but I did get to talk to Scott and that always means that I get to ask him questions!

You can see that the 1st floor is just about finished so the logs are just about done.


In the closer shot below you can see better what they are doing. The log they are working on is on its side while they do some custom cutting to make it fit better with the one below it. Steve is cutting it to fit.

Scott was there to pick up the check and to pick up some of the boards that they had been going to use to finish the deck but were not straight enough so he could take them back to the place he bought them and get them replaced.
We also got to talk about what to do with a couple of other things. First, we may decide to leave off the steps on the front porch altogether and replace them with a 'bridge' that will go straight out from the front porch to the ground out in front of it.
That will allow a power chair or wheelchair to drive straight up onto the porch should Kathy need that later. If we have steps we'd also have to have a ramp or 'bridge' somewhere off the deck in front anyway. Scott says that we can probably have it go out to a concrete parking pad or concrete driveway or to a sidewalk or stone path, etc and it could still be almost perfectly level since the 'yard' in front goes up slightly from the front porch.
Also, it looks like we'll have the steps at the rear of the deck go off of the back corner outside the screened room. There will be a landing off the back corner and the steps will then go down and back toward the garage door entrance and come down right there onto the driveway beside the back portion of the garage door.
Regarding the different coloration of the logs due to some being in the sun and other not, etc due to the fact that they have been in the sun with some in sun and some in shade (due to being stacked onto others, etc) they have a plan for that. Roberto and his wife will later bleach all the logs inside and out to make them more consistent in color and get out (or off) markings that might not should be there. They they'll sand the inside of the logs so that they are not rough.
The outside of the logs will be stained and protected by a Honey-colored preservative and stain combination made by WoodGuard. Scott recommends that we not stain the inside walls and just keep them a natural color to keep them light colored. We may just do that since we both like the natural look pretty well.
The honey-colored preservative/stain can also be used to stain the deck as well. It will be light. I think that we agree on that also since if we were to stain the deck darker then any of our beautiful Alabama red dirt that we got on our shoes would leave noticeable tracks on the deck. Clay concurs that dark is not good for the deck since he said it was a problem in their Woodstock house when they had a dark reddish color on their deck.

Tuesday, August 21, 2007

2007_08_21 Deck almost done - 7 rows of logs up

They have virtually finished the deck floor except for trimming a few boards at the back corner outside the dining room and for the last board or so across the very back of the deck.

There may be a reason for that remaining section not being done, but I don't know what it is. It's almost like they intentionally are leaving it undone because they have obviously moved on to the logs and done quite a bit of work on them since the last deck work they did.

Below is a view of the front of the house now:


The view below is taken from the corner of the house where the laundry room/pantry will be. In the far corner you can see (from left to right) the French doors at the end of the great room, the door from the great room to the screened room, the French doors in the master bedroom, and the window in the master bedroom.


The little dog, below, is the one nicknamed Ruby by Kathy and she is looking at the back edge of the deck wondering why it hasn't been completed. She told me that they had to be a reason for that being left undone, but neither of us know what it is.

Here's what Ruby was looking at in the picture above:

Below you can see a good view of the dovetail joint corner construction. You can also see that the logs are of varying colors from log to log and, sometimes, within one log. After all, wood does vary from board to board and from the sap wood to the heart of the logs so there will be a good bit of variation. Some of the difference could also be due to some of them getting sun for the last month and others not since the coverings have pretty much been blown to heck by the wind, but I'd guess that they'll all get plenty of sun between now and when they get stained and sealed later and that'll likely even out some of the difference from one log to another.


The picture below is a view out through the French doors in the master bedroom from pretty much where you'd be when in the bed.

This little window is the kitchen window so this is basically what will be in your view when looking out the kitchen window except that, of course, there will be a deck railing there too. Rose wants to help us try to figure out what to plant out there to make it pleasing. The bottle of water won't be there (unless we decide to keep it there). The Pella windows haven't been delivered yet. They will come on a separate shipment later directly from Pella.


I may go up there again tomorrow during the day since we think that Scott is going to be there unless his plans have changed.

We have been talking with a company that does installations for both DirecTV (satellite TV) and DirecWay (satellite internet connection) and we want them to be able to give us (and Scott) their advice regarding the type and number of cables and wiring that will need to be installed to get the best quality of service. Since we won't be in a place where either cable (for TV or Internet) or DSL (for Internet) will be available our only options for now will be getting all that via satellite.

The Internet connection won't be as fast as most of you folks have out there now via DSL or high speed cable, but it'll actually be much faster than the slow cable we've had for the last 2 years. We've been opting to take just the basic service that came as part of our apartment rent rather than paying extra for the higher speed connection. If we can live through what we've been using the service we can get through DirecWay will actually be a breath of fresh air!

We also need to decide what company we want to use for a monitored security alarm system and get them to be ready to make sure that whatever wiring we need for that can be done soon.

Friday, August 17, 2007

2007_08_17 Deck and more deck to go

Well, the deck goes on ... and on ... and on. They had hoped to finish this week, but it wasn't to be. They'll probably finish Monday or so.

Below you can see that they are working on the deck behind the master bedroom through what will later become the French doors there that open out onto the screened room.

This shows the guys getting the support post plumb before nailing it to the joist's and their frame above.

Here Brandon and Steve are marking where the joists will be attached.


As they finished for the day the back deck joists are about 75% of the way completed across the back. They had to wrap it up for the day and get their tools put away for the day (and for the week really).


The deck at the back is going to be somewhere near 16 feet from the ground. This is taken from the driveway area looking up toward the underneath side of the deck. As you can see there are a LOT of support posts around the house since the deck will go all the way around the house.
The bottoms of the support posts will be bolted to the concrete footers. By the way, I learned something today that I had not known for sure before since I had not been there when they poured the concrete footers for these posts. There had been iron re-bar left over and left on the job site by the company that poured the concrete footers for the basement walls. So, the crew working on the footers for the posts cut up the re-bar into short segments and used it in the concrete footers for the posts.

Maybe next week the temperatures will cool off a little bit. They have been consistently in the 105 to 106 range this week even up on the mountain. In fact, for nearly 2 weeks it has been over 100 every day. It was less brutal today since there were some clouds to keep the sun off.

Wednesday, August 15, 2007

2007_08_15 Septic field done- Electricity in- More decking

Alabama Power trucks came today and put in a transformer on our power pole and hooked up the power to a temporary pole beside it. It has electrical outlets on it that the construction crew can plug their saw, nail guns, etc into so they won't have to use the gas generators so much. They were happy today! It was a lot quieter after that.

Below you can see the transformer and the temporary pole at the bottom right corner of the photo.


Below is a view from the front again. You can see that they now have "doors" where some of the doors will go. The front door is in the middle. The one to the left is an entrance from the outside to the laundry/mud room/pantry combination that is just between the front porch and the kitchen. Further to the back right you can see where the French doors in the bedroom will open onto the screened room on the back. What you cannot see from here, but will later, is the door that will open from the side of the great room onto the screened room so that you can get to the screened room without having to go through the master bedroom.


The septic system was completed, inspected, and the dirt put back over it Monday after I left, so today (Wednesday) it was already done. The view below is from where the French doors in the great room will be down the hill where the septic system was installed. The deck will eventually go on here so you won't be able to see straight down to the ground. You'll be looking further out toward the cleared area.
Below I'm standing down the hill looking up toward the house. You can see that the septic guys finished their work and covered up the Infiltrator system and smoothed out the dirt that had been piled up on Monday.
They also continue to make progress on the decking. Since the septic guys had removed their heavy equipment they were able to put in the remaining concrete footers for the deck support posts in the rear of the house so that the rest of the deck should be clear sailing now. They may finish it as early as Friday afternoon at this rate if things go well.
The shot below is standing in the end of the great room looking west toward the screened room. Now you can see the door that will be there. Before someone asks, the angled boards are just braces to hold them in place for now.
Steve is getting the 2 x 10 deck floor joist aligned before nailing it with a nail gun. They are gradually getting closer to the back of the house. It's hard to see him, but Roberto is standing below Steve.


This little short log has the strips of rubbery material on the bottom log to help provide a better seal and insulation between it and the log that will fit onto it. One of the 6' French doors will go to the right of this log.


Can you see the green marks in the picture below? No? Make an appointment to get your eyes checked. Oh, you can? OK. Stay with me now because this is explained after the picture below.

The bottom logs have (underneath them) a threaded metal baseplate that is fastened into their bottom surface. and go up slightly in a hole. These holes go through all the logs all the way from the bottom of the wall to the top.

Once the wall of logs is complete, a very large threaded metal rod is placed through the log wall through those holes and it screws into the baseplate that is on the bottom logs. Then a large spring is put over the rod and a flat 2 x 4 is put on top of the top log with big washers and a nut that screws down onto the threaded metal rod. It is tightened until there is no space left between any of the coils of the spring. It is fastened in that tightened condition. Since all wood shrinks as it dries out over the years (and logs are ... well ... wood and lots of it) they will shrink some as time goes by. As they shrink and settle as a result, the giant springs keep enough downward pressure on the log wall to keep all the log joints held tightly together without having to require any attention from the owner or builder.

Now, remember the green lines? No? OK, either remind me to give less detail or make an appointment to get your memory checked. If yes, then you've been waiting for this:

The green lines mark where the metal baseplates are located. There are some other holes too, but the green ones are where the metal rods will end up going.


Below Brandon is in a prone position so he can put pressure on the deck board with his feet while Randy nails it down with the nail gun. They make sure that they are all tight together. Again, as they shrink there will be some small gap between them so I guess they want to start out with them being tight.


It was only 105 degrees today. Not as bad as the 108 yesterday according to the guys. Whenever a small cloud would give a few moments of shade it was a reason for celebration.
They hope to finish the decking by the time they get through on Friday, but that is just a guess at this point.
Kathy and I have plans tomorrow so I probably won't go back till Friday.

Tuesday, August 14, 2007

2007_08_13 Base layer of Logs and Septic Inspected

Two basic things happened today. The crew that wanted to be working on the deck had to stop work on it to wait for the septic system work to be finished, inspected, and the machinery they were using out of the back of the house so they could pour more concrete footers for the support posts for the deck in the back of the house.
Below you can see what they decided to work on while they waited. They decided to put down the base layer of the logs in a few places. They put down a 6" wide type of foam insulation strip first and the first logs go on that. The very first one they put down is a smaller one in height (i.e. not the 6" x 12" type). I don't really know how to explain it well, but you can't put down the 1st row and have all the logs be 12" tall because if you did then they could not go one over the other in the dovetail fashion. So, you'll see in some of the corners that they did today that the adjoining corner logs (although they are very short due to 2 sets of 6' French doors going in there) are the full 12" in height.

They attach the first ones to the 2 x 10s that are already around the perimeter of the sub-floor with long screws. The rest of the logs will be connnected to these with long thru-bolts that will go through all the logs and also keep pressure on them with a large spring to make sure that as the logs shrink due to aging that they all stay pressed together tightly.
Then they put the next log end to end (with a type of insert that goes into a groove on the end of each log from top to bottom), toe-nailed it into the end of the other log to keep it from moving away from it, and then screwed it down like the first one.
Below you see one of the workers holding one of the small logs that mates with the shorter one on the side. It is short since one of the French doors will start where it stops.
Now that short log is attached at the corner. You can see that it is taller and from here on up the logs will alternate one on top of the other and the dovetail ends will fit together.
Below you can see 2 of the 3 rows of the Infiltrator system that is the drain field for the septic tank. From the septic tank there is a long 6" (I think) pipe that runs down the hill for about 30 or 40 feet to the 1st of 3 rows of the Infiltrator system. They run perpendicular to the pipe going down the hill. The 1st row of the Infiltrator system is 68 feet from one end to the other, the 2nd is also 68 feet, and the 3rd row is 64 feet long. So, there is lineal 200 feet of it.
Here is a view along one of the lines. They are all kept level from one end to the other (within a 2" tolerance from one end to the other).

Below you can see the filter that goes into the septic tank between the stuff in the tank and what goes into the pipe and down to the Infiltrator system. You can't tell it from this photo, but the long red thing has very small slits in it so that it will not permit anything but liquified effluent to go into the drain field. Solids are not to go into the drain field.
If there should ever be a problem with the tank not draining properly (now get ready for this) you can remove the green tank cover, remove the round concrete top which has a nice metal handle on it to make it easier, pull out this filter, and use a hose to rinse it off, then put it back in the same way you took it out. It has an arrow on the top of it that points toward the exit pipe to show you which way to insert it. I guess we need to make sure that we always have some rubber gloves handy, huh? :-)

Jerry said that there probably won't be a problem, but we need to know! He said that with only 2 people living there the tank probably won't need to be pumped out for maybe 10 years. He confirmed that there should be no need to use anything like Rid-X to add bacteria since there should be plenty naturally. The written material also says that.

Below you can see where the pipe from the septic tank has a 90 degree angle joint that directs the liquid from the septic tank into the Infiltrator.

Here one of the guys from Bailey Environmental Services, Inc is showing me why the pipe that connects the 2nd row to the 3rd row goes UP from the one in front of him before going DOWN to the next row. The bottom of the pipe at the top of the little "hump" needs to be just slightly higher than the top of the one down the hill. That is so that the entire length of the row above needs to fill up before sending any overflow to the row below it. I would have thought that it would have been just the opposite (i.e. that they would all run downhill so that the liquid would tend to go all the way to the one at the bottom of the hill, but that's wrong). I guess it's a good thing I don't install these things!

I stuck the camera down into the opening of the septic tank to show you what it looks like inside. It surprised me that they have these dividers in them from one half of it to the other and I have no idea why the little squares on each side at the bottom. It is a 1,000 gallon tank.

Below you see Jerry Bailey (the company owner) at the left. The woman is the inspector from the St. Clair County Health Department. She drew out a diagram of the entire system and checked everything to make sure that it was installed properly. She had them show her (with their laser surveyor-type equipment that there was no more than the 2" difference between the height of the lines from one end to another, etc. She checked the tank and the Infiltrator system. She signed off on it and gave the paperwork to Jerry. She'll file a copy with the Health Department and Jerry will eventually send the pink copy of it to our builder or to us (I'm not sure which now).

Sunday, August 12, 2007

08/12/07 Infiltrator System info for those interested

Tom asked a couple of questions via email:
1. How far away is the emergency response team?
2. What is the infiltrator and what does it do? Tom, 8/12/07

Answers:
1. I don't know how long it would take for a 911 call to get a response. I do know that the responders would be from the Straight Mountain Volunteer Fire Department. The station is about 3 miles away, but I have no idea how long it takes the guys to get to the station and get to you. However, I'd not expect it to be quickly!

2. The Infiltrator is what they now often use to replace the old method of just having pipes with holes in them resting on gravel to let the liquified effluent drain into the ground. Since I know that you are someone who is interesting in learning new stuff check out the link below that I just found. It is an Infiltrator system owner's manual. It explains the traditional method of using pipes with holes and gravel and then the new Infiltrator System. It's quite interesting really. Really! It's over 1.3 MB in size so it takes a few seconds to load.

http://www.infiltratorsystems.com/pdfs/Sep_Sys_Man.pdf

2007_08_11 Deck started - Septic tank in - field to follow


We didn't go to the log home on Thursday or Friday since we got our Jeep detailed (it'd been years since the last wax job) on Thursday and Kathy had to get her new glasses lenses on Friday in B'ham. So, today (Saturday) we drove up there to see what had happened in our absence.
The deck is going up slowly. It will eventually go all the way around the house so Kathy can drive all the way around in her power chair if she want to do so.
Here's Kathy sitting on the front porch deck.
Wave to Kathy!!!
The septic tank is installed. The thing looks wider than I expected, but I guess that's good. The drain field has been delayed some. The Infiltrator system has not yet been done. I'd guess it will be on Monday. The pieces of it are down there in the woods by one of the bulldozers ready for next week. I suspect that Jerry's wife's surgery may have kept him busy longer than he originally thought.
Below you can see where the sewer pipe comes out of the house and goes down to the septic tank.
This was shot from up on the sub-floor looking down nearly 20 feet to see the entire septic tank and where the pipes come out to start down the hill further to the drain field.
Here is a picture of the deck in progress. The 6" x 6" pressure treated pine posts that support it are resting on the concrete footers that they poured the other day.


We had a problem getting Kathy back to the Jeep after this visit. We parked the Jeep up on the road and I helped her get down the hill to the house so she could sit on her front porch for the first time. With me on one side and her cane on the other we made it down fairly well.

Then she spent about 15 minutes walking around letting her look at things from the first floor. When we started back to the Jeep things started to get scary. It was hot today (102 degrees when we left home to drive up there) as it has been for the last week or more and it was still hot since it was only about 4:00 or so.

Almost immediately her legs ceased to function. At first she just couldn't tell where they were going and then it got worse. Before we got 20 feet away from the deck she became almost completely unable to use her legs. I was trying to hold her up and help pull her up the hill, but she wasn't able to use her legs at all and slowly collapsed on me. I tried to keep her from going to the ground, but she insisted that she just had to lie down and rest.

Well, that was the beginning of what was almost the end! Rather than walk she tried to crawl up the hill. However, she couldn't keep herself up on her hands and also couldn't get her legs raised up to get a knee on the ground. You can see that this is getting serious quickly!

I tried to pick her up, but she couldn't help at all and the days when I could pick her up and carry her over the threshhold are long gone (with my back disc problems and spinal stenosis and also that pesky loss of muscle!) and getting her up that hill with loose dirt was not really going to happen.
Well, it ended up with her having to lie face down in the dirt a couple of times to try to rest and a couple of times on her back and once on her side. This is with her with her hair down in the dirt, sweating, breathing hard and telling me multiple times that she couldn't help at all and she just needed to rest!

I kept telling her that she couldn't just stay there on the ground because it was just going to get worse rather than better and if we couldn't figure how to get her to the car soon I was going to have to either go get a neighbor to help or call 911 and see if the volunteer firemen could help us.

I kept trying to grab her under the arms and pull her up into a standing position, but she couldn't use her legs to remain there so down she'd go again.

Eventually, she had managed to skin up both her knees and burn her hands on the hot rocks. I decided that the only way we were going to get up the hill was for me to just grab both arms and pull her up the hill on her back. So that's what I finally did, but when we got up to the car we still couldn't get her into the front seat.

I picked her up and managed to get her trunk onto the front seat with her face down and her across the seat at an angle, but we couldn't get either of her legs inside the car since they wouldn't bend enough to get past the door frame. I then went and turned the Jeep on so the air conditioning could blow on her while we figured out what to try next.

I finally had to go backwards to get further forward. By that I mean that I had to grab her around the trunk (her's not the Jeep's) and haul her back out of the Jeep into what would normally be a standing position, but she couldn't stand. I somehow managed to turn her around enough to get her rear end on the side of the seat and let her lie back into the Jeep.

I managed to push her feet into the floorboard enough to get the door shut. We finally were able to drive back home with the A/C on high all the way. That took about 40 minutes. By then she had recovered enough that she could get inside the house with her walker. I made her get in the shower to clean up while I washed her shoes and clothes. Then I showered and we got dressed and then Rose and Merrill came over. They brought dinner and we watched TV till ... well, we're still watching it at 1:53 am!

The ordeal of getting up the hill took about 30 minutes. I took a couple of pictures of her while she was lying flat out on the hot dirty hillside resting for a minute. I took the pictures to remind us to never let her try to go up the hill again! I won't include them in this blog although I kept them on our computer to remind us of our near disaster.

It was a day to remember (I'm afraid!). It was also Clay's 31st birthday!

Thursday, August 09, 2007

All of this looks good. "Mac"

Wednesday, August 08, 2007

2007_08_08 Sub-floor - Deck support footers and Ready for drain field

The sub floor is done I think and now they are pouring the footers for the deck supports along the front and side opposite the garage side. Below is the view from the front of the house. You can see the sub-floor is finished. The square "hole" is where the elevator will be. The rectangular one toward the middle is where the stairs will go down (from right to left) from the 1st floor to the basement.


The picture below was taken when I was standing in the area where the dining room french doors will be.


The next one is from the great room french doors. Not much different, but here it is anyway! Note the back hoe and the bulldozer down there. I had 2 more from the master bedroom, but you've suffered enough for now. More later though I'm sure!

Basement from front of house to back. We'll probably wall off the area directly in the back and use it for storage. All these temporary supports come out later when the permanent support posts go in.

Shadows and light. Barbara ought to love this one since she's into shadows and light!


There was no work today on the septic system since Jerry's wife broke her hand and had to have surgery today to put a pin in it. He'll finish up either on Thursday or Friday. Here is one picture of the area where the drain field will go down the hill from the back of the house. Jerry (Bailey) is supposed to finish up the septic system either Thursday or Friday for sure.
There is a guy coming to do some inspections for the lender in the next couple of days. He called tonight to get directions.


Once the deck support footers (see below) are done they will start putting on the deck that surrounds the entire house. Right now there are 14 holes that have had concrete poured in them. The ones on the garage side and behind the house are not yet done. The ones behind the house would get in the way of the back hoe, etc getting out and the truck that delivers the septic tank itself so those will be done later.

I won't get up there tomorrow since I'm going to take the Jeep to B'ham to get it detailed. It is really in need of some cleaning and shining. Rose and Merrill have a "guy" who does a good job so we're taking it to him.