Here is a view of the now infamous kitchen cabinet section that the designer made too narrow and not deep enough for the cooktop and downdraft system to fit in without the corners of the cook top sticking out in the air over the angled portions of the cabinet. The angled portion was put in to allow the depth needed, but it was not made either deep enough or wide enough.
The solution required not only making the center section wider by less than an inch, but also moving the back wall a few inches farther back. Although that required cutting out the pretty cherry back to the cabinet in order to move the wall back and it ended up with pine instead of cherry the main thing wasn't what kind of wood you can see if you stick your head inside the cabinet doors and look at the back, it was that making the change provided the space required and the project could get back on track.
 Joe (whose last name I don't recall now) put in the tile in the master bathroom shower. You can see the rock that not only goes around the wall but will also be the floor material of the shower.
Steve watches as Roberto and Omar position stair treads before securing them with large diameter screws that must be 6 inches long or more. Each stair tread has 2 screws in each end. The 2 treads in the middle must be put in before the stairs are raised because afterward they'll not be able to get to the sides due to the log support post that goes up against the staircase being too close to it to allow access to where the screws will go.
Here Brandon is putting the screws into the treads through holes they drilled previously. Later they will fill these holes by gluing 1 inch dowels into the holes to cover the screws.

They have treads put in at the ends and the middle and are getting ready to lift them so they can be attached.
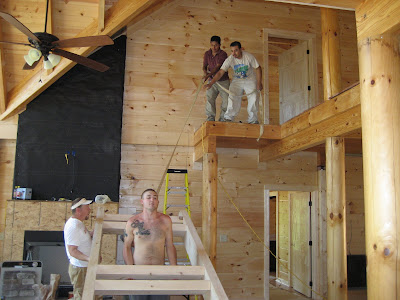
 They are getting ready to lift them with 2 of them in the middle, one at the bottom to keep it from sliding down, and 2 up on the top who will pull on a rope and then once it's where it goes they will screw it to the landing at the top.


Here you see Donato putting in some screws in the side while Roberto (on the stairs) and Omar look on.

This is the view from the bottom of the stairs once they were attached. Of course, they aren't finished since there are hand rails to go and finishing, but it's nice to finally get some nice wide stairs up there.
Below is just another view of the staircase showing all the steps in.


No comments:
Post a Comment